arista
Table of Contents
<2017-12-06 Wed>
How to run arista vEOS in OpenStack.
1. vEOS Image
1.1. Download
Download below files:
Aboot-veos-8.0.0.iso,vEOS-lab-4.20.1F.vmdk
1.2. Upload
Upload to OpenStack Glance:
openstack image create Aboot-veos-8.0.0.iso \
          --container-format bare \
          --disk-format iso \
          --file Aboot-veos-8.0.0.iso
openstack image create vEOS-lab-4.20.1F.vmdk \
          --container-format bare \
          --disk-format vmdk \
          --file vEOS-lab-4.20.1F.vmdk
1.3. List images
openstack image list
#=>
| name                  | id                                   | type       |
|-----------------------|--------------------------------------|------------|
| Aboot-veos-8.0.0.iso  | 43c78dee-e055-4592-9b81-d66f6a33584d | iso image  |
| vEOS-lab-4.20.1F.vmdk | ba02703d-6d2b-40a8-bdb7-bf41163d78f7 | vmdk image |
2. Boot vEOS VM
2.1. Prerequisite
Before boot VM, make sure: 1. OpenStack volume service - cinder is running, 2. Disable OpenStack security groups, 3. Disable ebtables on hypervisor
A workaround to disable ebtables:
ansible -m cron -a 'job="/sbin/ebtables -F" name="flush ebtables"' all
2.2. Boot VM
nova boot --flavor m1.medium \
    --image Aboot-veos-8.0.0.iso \
    --nic net-id=64304c68-646f-4a2b-8a7a-e8f557c4b94a \
    --nic net-id=15bfca37-119e-475e-ad0e-fc2e377cac32 \
    --nic net-id=7c072643-2170-4a46-9dc2-e04f5f427f72 \
    --block-device \
    id=ba02703d-6d2b-40a8-bdb7-bf41163d78f7,\
    source=image,bus=ide,dest=volume,size=4,shutdown=remove \
    veosvm1
2.3. Notices
- The first network is for vEOS management port, the left are for vEOS switch ports,
- The id(ba02703d-6d2b-40a8-bdb7-bf41163d78f7) in block device option is the image id of glance image vEOS-lab-4.20.1F.vmdk,
- Make sure bus is set to ide
3. Enable SSH
Get vm's novnc console:
nova get-vnc-console veosvm1 novnc
Go to the novnc console to configure network:
login: admin # default username admin, no password
> enable
# configure terminal
# interface management 1
# ip address 192.168.0.15 255.255.0.0
# ip route 0.0.0.0 0.0.0.0 192.168.0.1
# hostname veosvm1
# username admin secret 0 admin
# end
# copy running-config startup-config
Now you can use ssh ssh admin@192.168.0.15 to login.
4. Netbox Integration
4.1. Enable Management Api
ssh admin@192.168.0.15 # password admin
> enable
# config terminal
# management api http-commands
# no shutdown
# no protocol http
# protocol https
# end
# show management api http-commands #=>
Enabled:            Yes
HTTPS server:       running, set to use port 443
HTTP server:        shutdown, set to use port 80
Local HTTP server:  shutdown, no authentication, set to use port 8080
Unix Socket server: shutdown, no authentication
VRFs:               default
Hits:               75
Last hit:           36 seconds ago
Bytes in:           11714
Bytes out:          178064
Requests:           60
Commands:           147
Duration:           5.294 seconds
SSL Profile:        none
FIPS Mode:          No
QoS DSCP:           0
Log Level:          none
CSP Frame Ancestor: None
TLS Protocols:      1.0 1.1 1.2
   User        Requests       Bytes in       Bytes out    Last hit
----------- -------------- -------------- --------------- --------------
   admin       60             11714          178064       36 seconds ago

URLs
--------------------------------------
Management1 : https://192.168.0.15:443
# copy running-config startup-config
4.2. Napalm
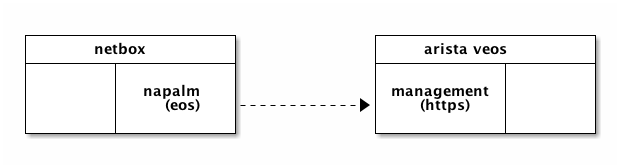
So that netbox can talk to vEOS via napalm:
+--------------------+             +---------------------+
|      netbox        |             |   arista veos       |
+--------+-----------+             +------------+--------+
|        |           |             |            |        |
|        |  napalm   |             | management |        |
|        |   (eos)   +-----=------>|   (https)  |        |
|        |           |             |            |        |
+--------+-----------+             +------------+--------+
5. A Clasic Configuration
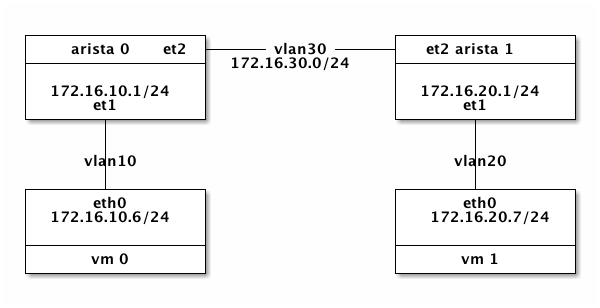
5.1. Topology
+-----------------+                  +-----------------+
|   arista 0  et2 +------vlan30------+ et2 arista 1    |
+-----------------+ 172.16.30.0/24   +-----------------+
|                 |                  |                 |
| 172.16.10.1/24  |                  | 172.16.20.1/24  |
|      et1        |                  |      et1        |
+-------+---------+                  +-------+---------+
        |                                    |
        |                                    |
      vlan10                               vlan20
        |                                    |
+-------+---------+                  +-------+---------+
|      eth0       |                  |      eth0       |
| 172.16.10.6/24  |                  |  172.16.20.7/24 |
|                 |                  |                 |
+-----------------+                  +-----------------+
|      vm 0       |                  |      vm 1       |
+-----------------+                  +-----------------+
5.2. Create Topology
---
- name: "Create network vlan10, vlan20, vlan30"
  hosts: localhost
  tasks:
    - name: "ensure networks created."
      os_network:
         name: "{{ item }}"
         state: present
      with_items:
        - vlan10
        - vlan20
        - vlan30
    - name: "ensure vlan subnets created"
      os_subnet:
        name: "vlan{{ item }}-subnet"
        state: "present"
        network_name: "vlan{{ item }}"
        cidr: "172.16.{{ item }}.0/24"
        enable_dhcp: True
      with_items:
        - "10"
        - "20"
        - "30"
- name: "Create arista vms"
  hosts: localhost
  tasks:
   - name: "ensure arista-0 created"
     shell: |
       nova show arista-0 &> /dev/null && exit 0
       nova boot --flavor m1.small \
         --image Aboot-veos-8.0.0.iso \
         --nic net-name=netops \
         --nic net-name=vlan10,v4-fixed-ip=172.16.10.1 \
         --nic net-name=vlan30,v4-fixed-ip=172.16.30.3 \
         --block-device \
         id=ba02703d-6d2b-40a8-bdb7-bf41163d78f7,\
         source=image,bus=ide,dest=volume,size=4,shutdown=remove \
         arista-0
   - name: "ensure arista-1 created"
     shell: |
       nova show arista-1 &> /dev/null && exit 0
       nova boot --flavor m1.small \
         --image Aboot-veos-8.0.0.iso \
         --nic net-name=netops \
         --nic net-name=vlan20,v4-fixed-ip=172.16.20.1 \
         --nic net-name=vlan30,v4-fixed-ip=172.16.30.4 \
         --block-device \
         id=ba02703d-6d2b-40a8-bdb7-bf41163d78f7,\
         source=image,bus=ide,dest=volume,size=4,shutdown=remove \
         arista-1
- name: "Create vm"
  hosts: localhost
  roles:
    - role: vm
      group: vlan10vm
      network: vlan10
- name: "Create vm"
  hosts: localhost
  roles:
    - role: vm
      group: vlan20vm
      network: vlan20
5.3. Configure Arista 0
enable
config terminal

interface management 1
ip address 192.168.0.14.16

vlan 10
vlan 30

interface ethernet 1
switchport mode access
switchport access vlan 10
no shutdown

interface ethernet 2
switchport mode trunk
switchport trunk allowed vlan 30
no shutdown

interface vlan10
ip address 172.16.10.1/24

interface vlan30
ip address 172.16.30.3/24

ip routing
router ospf 10
network 172.16.10.0/24 area 0
network 172.16.30.0/24 area 0

end
5.4. Configure Arista 1
interface management 1
ip address 192.168.0.26/16
no shutdown

vlan 20
vlan 30

interface ethernet 1
switchport mode access
switchport access vlan 20
no shutdown

interface ethernet 2
switchport mode trunk
switchport trunk allowed vlan 30
no shutdown

interface vlan 20
ip address 172.16.20.1/24
no shutdown

interface vlan 30
ip address 172.16.30.4/24
no shutdown

ip routing
router ospf 10
network 172.16.20.0/24 area 0
network 172.16.30.0/24 area 0

end
5.5. Test
login vm-0 and ping vm-1.